Global Mapper can import vector data from and export vector data to the following spatial databases:
Global Mapper can import raster data from and export raster data to the following spatial databases:
NOTE: In order to import data from an Esri ArcSDE geodatabase or export data to any Esri geodatabase, you must have installed and licensed a copy of Esri ArcGIS 9.3.1 or higher. Support for Esri Geodatabases is only available in the 32-bit version of Global Mapper. You can install the 32-bit and 64-bit versions of Global Mapper side-by-side, and they can share a license.
Loading Data from a Spatial DatabaseThere are two ways to load data from a spatial database:
Specify the connection parameters for the spatial database connection. This applies to all of the enterprise databases: ArcSDE, MySQL, Oracle, and PostGIS. Use the Connection Manager to define spatial database connections. You can access this functionality by choosing Open Spatial Database... from the File menu.
Specify the file that contains a Spatialite database (*.sqlite), an Esri file (gdb) or personal geodatabase (*.mdb), or an Esri ArcSDE geodatabase connection definition (*.sde). Use Esri ArcCatalog or ArcMap to create an ArcSDE geodatabase connection file. Choose Open Data File(s) from the File menu to perform this task.
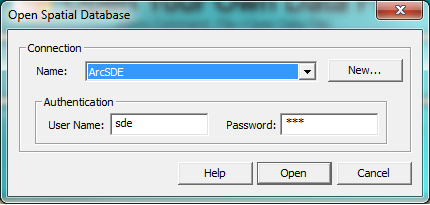
The Open Spatial Database dialog allows the user to select the connection parameters that will be used to open an enterprise spatial database.
The Name drop-down list contains all of the spatial database connections that are currently defined.
Click the New... button to define a new spatial database connection. When the button is clicked, the Database Connection Dialog will be displayed. After you finish setting up a new connection, that name of that connection will be added to the list and become the selected connection.
The User field specifies the user ID required to connect to the database. If the selected database connection has a predefined user ID, then that value will be displayed in this field. You can override this value, if needed. If you type in a different user ID, the stored database connection definition will not be changed.
Use the Password field to specify the password required to connect to the database. If the selected database connection has a predefined password, then that value will be automatically entered into this field. You can override this value, if needed. If you types in a different password, the stored database connection definition will not be changed.
After you have selected a connection and entered a user ID and password, click the Open button to bring up the Spatial Database Import Options Dialog to choose a table from the database.
The Cancel button quits the process of opening a spatial database.
The Help button displays the Global Mapper help for this dialog.
Spatial Database Import OptionsThe Spatial Database Import Options dialog is used to choose the table or tables to be loaded from a spatial database. Global Mapper displays this dialog after you have chosen a spatial database connection, a Spatialte database, an Esri file geodatabase, an Esri personal geodatabase, or an Esri ArcSDE geodatabase connection file.

The table list contains the names of the tables in the spatial database. Put a check next to one or more table(s) to indicate which tables you want to load.
Click the Check All button to place select all of the tables in the list.
Click the Clear All button to remove the check mark from all of the tables in the list.
Once you have marked the tables to be loaded, click the OK button to load the tables.
The Cancel button quits the process of opening a spatial database.
The Help button displays the Global Mapper help for this dialog.
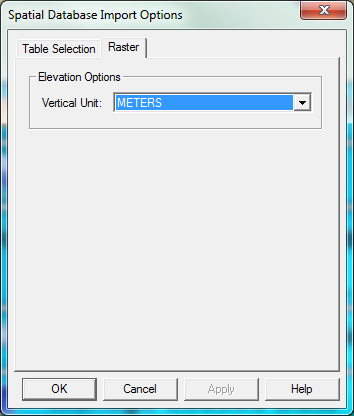
If the spatial database being opened contains elevation data or raster imagery, the Spatial Database Import Options dialog will contain a tab to specify raster options.
Under Elevation Options, choose the Vertical Unit for the elevation data. The default is meters. If you don't choose the correct unit here, you can always fix it in the Control Center.
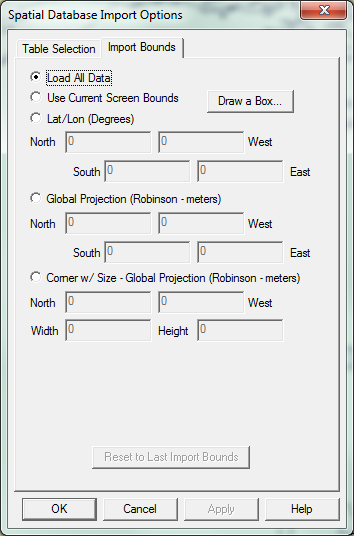
If the spatial database being opened contains vector data, the Spatial Database Import Options dialog will contain the Import Bounds tab. This tab allows the user to select a subset of the input data based on a bounding box. All geometries that intersect the bounding box will be imported into Global Mapper. This functionality applies only to vector data in a spatial database.
You can specify the bounding box in the following ways:
Choose Load All Data to load all of the data in the selected database tables into Global Mapper.
Choose Use Current Screen Bounds to use the current Global Mapper screen bounds as the to define the input bounds. If there is no data loaded into the viewer, then this option will not be available. If there is data loaded in Global Mapper, but the full extent of the data is on the screen, then this option will no be available.
Click the Draw a Box... button to draw the bounding box on the screen using your mouse. If there is no data loaded into the viewer, then this option will not be available.
Choose Lat/Lon (Degrees) to specify the northwest and southeast corners of the bounding box in degrees of latitude and longitude.
Choose Global Projection to specify the northwest and southeast corners of the bounding box in the unit of the current global projection. If there is no data loaded into the viewer, or the viewer currently has no projection defined, then this option will not be available.
Choose Corner w/Size - Global Projection to specify the northwest corner, and the width and height of the bounding box in the unit of the current global projection. If there is no data loaded into the viewer, or the viewer currently has no projection defined, then this option will not be available.
Click the Reset to Last Import Bounds button to retrieve the most recently defined bounding box in the unit of the current global projection. If there is no data loaded into the viewer, or the viewer currently has no projection defined, then this option will not be available.
The Global Mapper display space adopts the coordinate system of the first table opened (assuming that there is currently no data loaded.) Subsequent data sets will be transformed to the coordinate system of the first data set loaded or the display projection subsequently selected from the configuration dialog.
Exporting Data to a Spatial DatabaseIn order to export data to a spatial database, you need to specify the location of the spatial database and one or more table names in which the data will be stored. When writing to an Esri file geodatabase or personal geodatabase, you can create a new database file before writing the tables. If you are exporting data to any of the enterprise database types, you can only create tables in an existing database.
To export data to a spatial database, you start by choosing one of the following export options from the File/Export menu:
Choose the option indicating your desired spatial database type, and press OK to continue.
If you choose Spatial Database from the list, Global Mapper will display the Open Spatial Database Dialog. Select the database connection that you want to use, and click OK to continue by specifying Spatial Database Export Options.
If you choose Spatialite DB Table, Esri File Geodatabase Table or Esri Personal Geodatabase Table, Global Mapper will display the Select Esri Geodatabase Dialog. The following sections describe that dialog and the required steps to export a table.
Selecting a Spatialite database, Esri File Geodatabase, or Personal Geodatabase for ExportUse the Select Database Dialog to choose a Spatialite database, Esri file geodatabase or personal geodatabase where you want your exported data to be stored. You can also create a new database, if necessary.
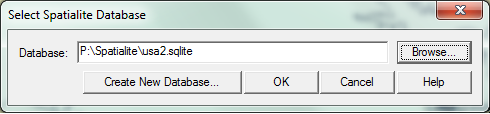
You can enter the full path to a Spatialite, file geodatabase or personal geodatabase in the Database field, or click the Browse... button to select an existing database from the file system. If you are selecting a Spatialite database or a personal geodatabase, then Global Mapper will display the standard Open File dialog. Spatialite database files have an extension of .sqlite, and personal geodatabase files have an extension of .mdb. If you are selecting a file geodatabase, Global Mapper will display a Folder Selection dialog. Folder names that end in .gdb contain file geodatabases.
If you want to create a new database, click the Create New Database... button. Global Mapper will display the Create Database Dialog. Once you have created a new database, the full path will be in the Database field.
Once you have selected a database, click the OK button to continue by specifying Spatial Database Export Options.
The Cancel button quits the process of exporting data to a spatial database.
The Help button displays the Global Mapper help for this dialog.
Creating a Spatialite Database, Esri File Geodatabase or Personal Geodatabase for ExportUse the Create Database Dialog to specify the location and name for a new Spatialite database, Esri file geodatabase or personal geodatabase.

Type the full path of the folder where the new database will be located in the Location field, or use the Browse... button to choose a folder from the file system.
Type the database name in the Name field. You do not need to add a file extension -- one will be created automatically based on the kind of database being created.
Once you have entered both the location and database name, click the OK button to create the database.
The Cancel button quits the process of exporting data to a spatial database.
The Help button displays the Global Mapper help for this dialog.
Spatial Database Export OptionsUse the Spatial Database Export Options Dialog to specify the table name(s) and data extents to be used for this data export. A spatial database table is restricted to a single geometry type. This dialog allows you to specify table names for polygon, line, and point geometries based on the data types that are currently in the display.

On the Table Selection tab for vector data export, you can specify a table name for each of the data types that are currently in the viewer. Note that if you choose an existing table, the data in that table will be replaced with the data in the viewer.
To export polygon features, check the Export Areas box, and enter a table name in associated entry field. If you want to export data to an existing table, choose the name from the drop-down list.
To export line features, check the Export Lines box, and enter a table name in associated entry field. If you want to export data to an existing table, choose the name from the drop-down list.
To export point features, check the Export Points box, and enter a table name in associated entry field. If you want to export data to an existing table, choose the name from the drop-down list.
Place a check next to Warn Before Replacing Existing Tables to be notified when you choose a table that already exists. You can choose whether to replace the existing table or specify a new table name.
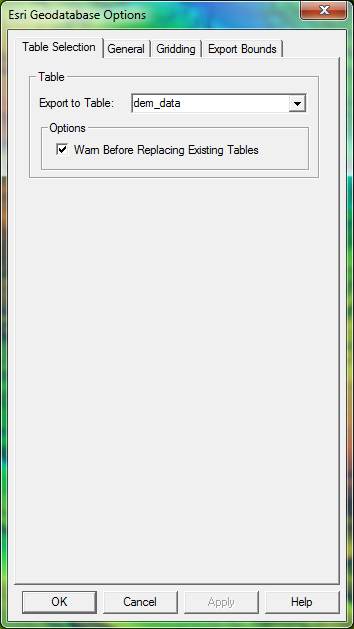
On the Table Selection tab for elevation or raster imagery export, you can specify a table name where the data will be stored. Note that if you choose an existing table, the data in that table will be replaced with the data in the viewer.
Enter a table name in the Export to Table field. If you want to export data to an existing table, choose the name from the drop-down list.
Place a check next to Warn Before Replacing Existing Tables to be notified when you choose a table that already exists. You can choose whether to replace the existing table or specify a new table name.
You can use the Export Bounds Panel define the extent of the data that you want to export.
Once you have chosen table names and data extents, click the OK button to export the data to the geodatabase tables.
The Cancel button quits the process of exporting data to a spatial database.
The Help button displays the Global Mapper help for this dialog.
Spatial Database Connection ManagerThe Spatial Database Connection Manager allows you to create and save enterprise spatial database connection definitions. Once a connection has been defined, you can use it when importing and exporting spatial database tables. These connection definitions can be used with the following spatial database:

The Connections area contains a list of existing connections. To create a new connection, click the New... button. Global mapper will display the Define Spatial Database Connection Dialog, which can be used to specify the connection parameters for the new connection.
To update an existing connection definition, select it in the Connections list and click the Edit... button. Global mapper will display the Define Spatial Database Connection Dialog, which can be used to update the connection parameters for the selected connection.
To delete an existing connection, select it in the Connections list, and click the Delete button.
Click the Open Connection... button to open the currently selected connection and load data into Global Mapper.
When you have made all of your changes to the spatial database connections, click the OK button to store the new definitions.
The Cancel button quits the process of changing spatial database connection definitions.
The Help button displays the Global Mapper help for this dialog.
Define Spatial Database ConnectionUse the Spatial Database Connection Dialog to create or modify the parameters that define an enterprise database connection.
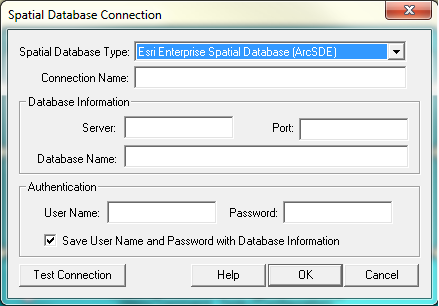
Choose the option from the Spatial Database Type drop-down list that corresponds to the spatial database you are using.
Type a unique Connection Name to identify this connection. The name you use here will be listed in the connection list on the Open Spatial Database Dialog.
The Database Information section specifies the location of your database on the network. Fields that are not needed for a particular database vendor will be greyed out and disabled.
In the Server field, type the name of the network server where the database is located.
Specify the required server port in the Port field. In an Esri ArcSDE geodatabase connection, this is also known as the Service parameter.
Enter the database name in the Database Name field. Note that the database name is optional when defining an Esri ArcSDE geodatabase connection. Whether or not it is needed is specific to your particular installation.
Use the Authentication section to specify the user and password required to log on to the spatial database.
Type a valid User Name.
Type a valid Password
Put a check next to Save User Name and Password with Database Information if you want to save the authentication information along with the connection definition. The password will be encrypted.
Click the Test Connection button to determine whether or no the connection parameters can be used to connect to the spatial database.
Once you have entered all of the required information, click the OK button to save the connection definition.
The Cancel button quits the process of creating or updating a connection definition.
The Help button displays the Global Mapper help for this dialog.